With Invo Booking, your financial institution can say goodbye to scheduling conflicts with miscommunications within the branch. Invo Booking allows staff and your customers to easily schedule appointments from each of their digital channels.
In this article:
Calendar Integration
Microsoft Exchange Integration
Google Integration
O365 Integration
Settings
.png?width=688&height=129&name=MicrosoftTeams-image%20(30).png)
Integration with Google and Outlook Calendars
Invo Booking not only operates independently as a stand-alone appointment scheduling system, but also integrates seamlessly with Google and Outlook calendars. This scheduling tool not only sees when you have an appointment scheduled, but it can also see when you have other things on the calendar that would prevent you from taking an appointment.

Calendar Integration
Overview
The Invo Booking module has options to integrate with third-party applications. This document is designed to provide step-by-step procedures in establishing your environment to work with these applications.
Invo Booking supports the integration of third-party calendar systems for both the frontend and backend side of your Invo Banking platform.
- Frontend-integration allows employee/agents to securely authenticate to their preferred calendar account to pull and show events within the Invo Booking dashboard. This integration does not require any storage on our backend. The Invo server environment relays all agent requests, which are related to their calendar, to the third-party calendar server. The Invo backend does store, nor manipulate, the data.
- Backend-integration allows the Invo Booking platform to periodically pull the availability-related information of all registered agents/employees. An agent is considered registered in the Invo system if his/her email is connected to the third-party calendar server that you choose for this integration. Invo does not store detailed information of agent’s events. The system only stores the status (busy or available) of each agent. The backend-integration also allows Invo systems to create and sync Video Banking scheduled events on your unique calendar server platform.
As the financial institution, it is possible to have multiple frontend-integrated calendars in the Invo Booking platform. However, multiple backend-integrated calendars cannot be connected simultaneously. The backend-integrated calendar provider is therefore considered as the primary one.
Google Calendar, Outlook 365, and Microsoft Exchange are all supported for backend integration. At this time Google Calendar and Outlook 365 are both supported for frontend-integration services.
Enablement of these applications for the financial institution environment will allow for access to the dashboard of the respective third-party applications and provide for more controls and tools to manage these applications. This also provides for the financial institution to control any applicable billing of applications respectively.
Delegation of management for these third-party applications to the Invo Solutions support team is also possible. However, enhanced Professional Services support fees do apply. Please contact your respective Invo Solutions Account Manager for more information.
Front-end Integration
Third-party calendars are useful and can be integrated into your Invo Booking module when activated. When integrated, agents can pull unique personal events from third-party calendars, and display them conjointly with the other events on the Invo Booking calendar view. Invo supports the integration of Outlook 365 and Google Calendar. When enabled, agents can find, on the bottom left corner of their Booking Management page, a gear button where they can initiate an authenticated connection with the third-party calendar allowing the front-end application to query data directly from the calendar server using a dedicated Restful API.
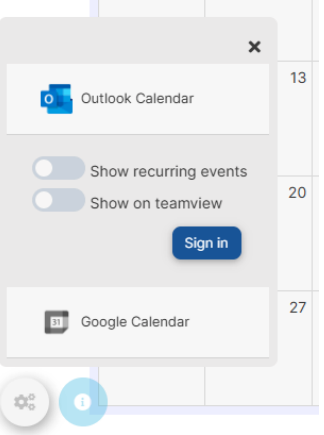
Click the Sign in button and follow the guided authentication steps to authenticate. Once authenticated, agent can use the setting to control what to show on their calendar view related to the given calendar:
- By default, an agent event is only shown on the Me view

- If you want to show them on the other two view, switch on the Show on Teamview option
- By default, only non-recurring events are shown on the views. If you expect to see the recurring events too, turn on the Show recurring events option.
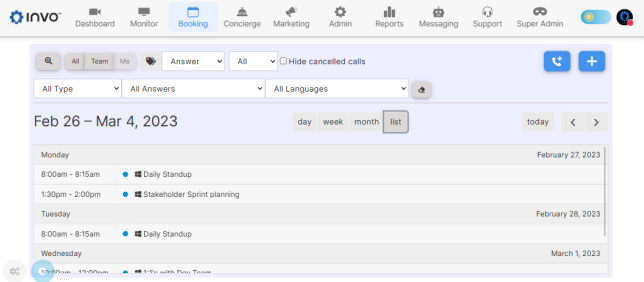
Sample view of the booking calendar view when Google and Outlook calendars are integrated is attached below:
Backend Integration
Microsoft Exchange
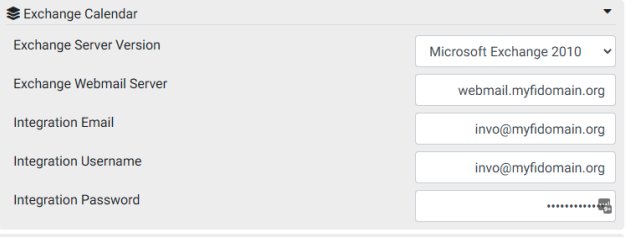
Microsoft Exchange is currently supported for backend-integration only. For this integration, the financial institution needs to create an Invo-dedicated user account on the unique Exchange server. The financial institution needs to provide the account’s credentials (username. password) and some other necessary parameters (version of Microsoft Exchange server, ME webmail server) via the Calendar configuration page
An app registration will also need to be completed.
To begin:
- Sign into https://portal.azure.com.
- Navigate to the Azure Active Directory.
- Select App registrations from the available options on the left-side panel
- Click on New registration
- Name your registration.
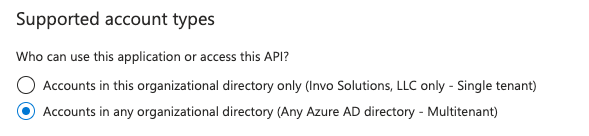
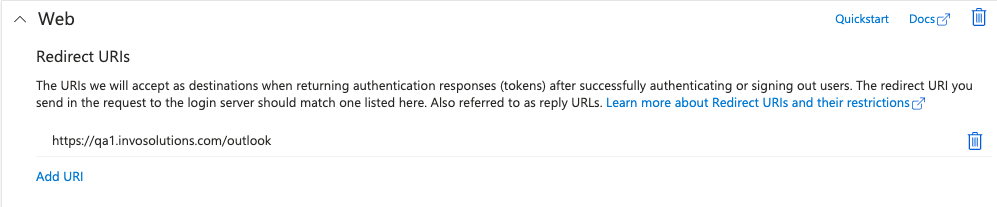
- For Supported account types, make sure to select option Accounts in any organizational directory only (Multitenant).
- Important: the redirect URI is necessary for a successful setup. Select Web and fill in the url with your organization’s live Invo website URL with /outlook included at the end.
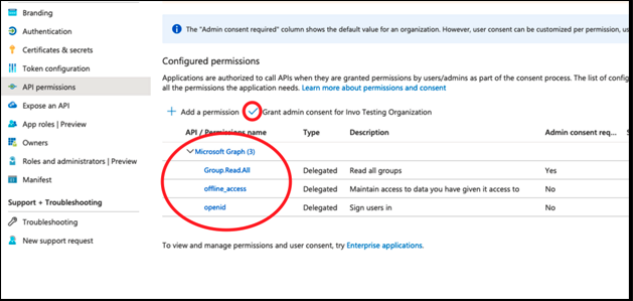
- Click on API permissions to add the following permissions to your newly created application:
- Group.Read.All
- offline_access
- openid
After the necessary permissions have been added, admin consent will need to be granted for the Group.Read.All permission. Please click the green checkmark labelled Grant admin consent for your-organization.
- If one does not currently exist, create an account on Google API Console.
- Create a project for your institution on the Google API console.
- Enable OAuth 2.0 on the created Google API Console:
- Click on the project Credentials option, then +CREATE CREDENTIALS and choose the OAuth client ID option.
- Choose Web Application for the application type.
- Name your OAuth client whatever you want.
- Add the base URL to the video banking platform,.i.e. https://videobanking.institution.org as Authorized JavaScript origin and Authorized redirect URI.
- Click on the Create button to finalize the creation of the OAuth Client.
- A window will show up giving you the Client ID and Client Secret of the created OAuth Client.
- Enable Google Calendar API
- Search for Google Calendar API and enable it
- Create an API key for it
- Click on the project Credentials option, then +CREATE CREDENTIALS and choose the API key option.
- Follow the instructions to create a restricted key for the Google Calendar API.
- Note the created API key.
- You need to provide your Client ID and the above API key in the Invo Booking environment settings
- From your Invo Banking settings page (Dashboard), click on the Calendar API option on the left sidebar.
- Click the edit button, you will see the options to turn on Google Calendar integration, and to set up the Client ID and the API key.
- Then, it is ready to go!
O365
To begin:
- Sign into https://portal.azure.com.
- Navigate to the Azure Active Directory.
- Select App registrations from the available options on the left-side panel
- Click on New registration
- Name your registration.
- For Supported account types, make sure to select option Accounts in any organizational directory only (Multitenant).
- Important: the redirect URI is necessary for a successful setup. Select Web and fill in the url with your organization’s live Invo website URL with /outlook included at the end.
- Click on API permissions to add the following permissions to your newly created application:
- Group.Read.All
- offline_access
- openid
After the necessary permissions have been added, admin consent will need to be granted for the Group.Read.All permission. Please click the green checkmark labelled Grant admin consent for your-organization.
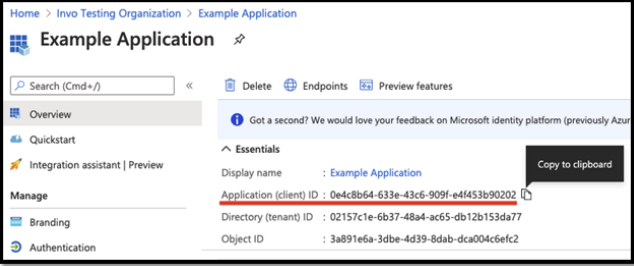
- From the Overview section, copy the Application (client) ID and save this value under outlook_client_id on your organization’s Invo website settings (required in a later step)
- Select Certificates & secrets from the available options on the left-side panel
- Under the Client secrets section click New client secret
- The name of the secret is not important for the setup.
- Select the longest time value for the expiration of the secret. There will now be a value associated with the secret once it has been created.
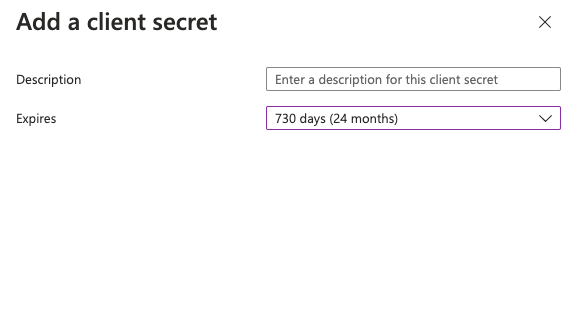
- Copy the secret’s Value and save this under outlook_client_secret under your organization’s Invo website settings (required in a later step).
- Explore the Calendars group setting. Turn on the Outlook Calendar setting and set the values obtained from the Azure App Registration in the appropriate text fields.

- Turn on Two-way integration, or Compute agent availability, or both to begin the integration process.
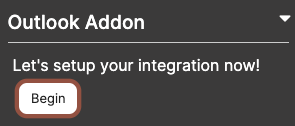
- Using the Outlook Addon on the right side of the screen, begin the integration process by signing into a Microsoft admin account.
- This admin account will only require the Application administrator role in order to communicate with the App registration. We recommend creating a separate account, and naming this account something related to scheduling, as it will appear in internal communication 'on behalf of' the group you select via the calendar invite.
- Application Administrator: Users in this role can create and manage all aspects of enterprise applications, application registrations, and application proxy settings. This role also grants the ability to consent to delegated permissions, and application permissions excluding Microsoft Graph. Users assigned to this role are not added as owners when creating new application registrations or enterprise applications.
- Application Administrator: Users in this role can create and manage all aspects of enterprise applications, application registrations, and application proxy settings. This role also grants the ability to consent to delegated permissions, and application permissions excluding Microsoft Graph. Users assigned to this role are not added as owners when creating new application registrations or enterprise applications.
- Once the account has signed in, you will be asked to create a group. This group calendar will also act as a host for the appointments. Our system will send the request to this group calendar, so we also recommend creating a new group, and naming it something related to scheduling. As mentioned above, the account you sign in with will send the invitation 'on behalf of' the group. Below is an example of how the internal invite will appear:

- Setup for Outlook calendar is now complete.
Settings
Overview
The Invo Booking module offers a variety of additional settings that involve configuring the user interface of the booking system to ensure that it is easy to use and navigate for clients. This includes setting up Mailer settings to ensure email communication comes from your organization instead of Invo, time related items related to appointment availability and customizing your Answers on which specific Answers you'd like to be able to schedule for.
Mailer Settings
Mailer Settings control what address external client facing communication comes from. These settings also apply to non-Invo Booking related communication as well.
NOTE: Please click here to view more details about Mailer Settings.
Branding
Setting Location: Admin > Manage Settings > Branding
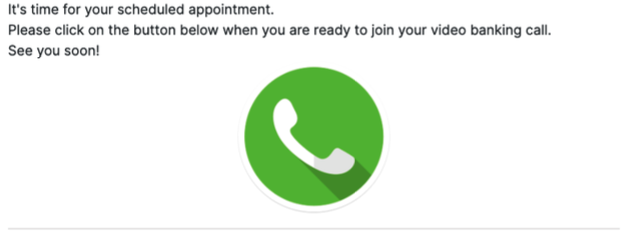
There is only one Branding image that is related directly to Invo Booking, and that is Join- Call Button Image. When an appointment is made for a Video Banking call, within the email communication that is sent, there will be a "view status" button. This will bring you to a status page for the appointment. If it's not time for the call to begin, the client will see a countdown timer. If it's time for the call, they will see the screenshot below. The green button in the middle is the "Join-Call Button Image" that can be edited.
General Configurations
Setting Location: Admin > Manage Settings > Invo Booking > General Configurations
- Allow public user to schedule a call
- This places a button on your Invo provided web landing page to allow your clients to schedule a call themselves.
- Contact field requirements
- This gives your admins the options to make either email, phone number, both, or neither required to complete the contact form.
- Maximum number of events that a public user can schedule
- This defines how many events your clients can schedule per day. Upon reaching the maximum number, your clients will be presented a prompt, and they can then decide to cancel a previous appointment if they wish.
- Maximum number of events that a public user can schedule
- This defines how many events your clients can schedule per day. Upon reaching the maximum number, your clients will be presented a prompt, and they can then decide to cancel a previous appointment if they wish.
- Outdated scheduled events
- This allows the permission for our system to purge all outdated scheduled events at midnight.
- Show scheduled calls on unassigned Agent dashboards
- By default, all unassigned appointments will be displayed on Agent dashboards who are associated with the same queue and language.
- Users who can assign
- These will be user roles who have access to assign appointments. Select each role you prefer to have the access:
- administrators, managers, booking-managers, agents
- These will be user roles who have access to assign appointments. Select each role you prefer to have the access:
- Users who can edit appointments
- These will be user roles who have access to edit appointments. Select each role you prefer to have the access:
- administrators, managers, booking-managers, agents
- These will be user roles who have access to edit appointments. Select each role you prefer to have the access:
- Users who can create appointments
- These will be user roles who have access to create appointments. Select each role you prefer to have the access:
- administrators, managers, booking-managers, agents
- These will be user roles who have access to create appointments. Select each role you prefer to have the access:
- Users who can delete appointments
- These will be user roles who have access to create appointments. Select each role you prefer to have the access:
- administrators, managers, booking-managers, agents
- These will be user roles who have access to create appointments. Select each role you prefer to have the access:
Time-related Configurations
Setting Location: Admin > Manage Settings > Invo Booking > Time-related Configurations
- Max duration (depreciated)
- The maximum duration, in minutes, that a scheduled call can be expected to last. It is only for forecast and time management purposes.
- Min duration (depreciated)
- The minimum duration, in minutes, that a scheduled call can be expected to last. It is only for forecast and time management purposes.
- Default duration (depreciated)
- The default duration, in minutes, that a scheduled call can be expected to last. Any call scheduled by a member/client will reserve a time slot with this default duration.
- Duration interval (depreciated)
- This allows to setup how fine an agent can schedule a call.
- Joining the call
- This defines how many minutes you want to open the call before the official start time to allow clients to join.
- Time for reminder email before the call
- This defines how many minutes before the scheduled appointment clients would receive a reminder email.
- Max waiting time
- Max time to wait for a client. Anything over this duration without the client joining, and the system will consider them late to allow the Agent to cancel the call.
- Disable Weekends
- This setting allows disabling/enabling scheduling calls on the weekend.
- Schedule-request confirmation timeout
- Amount of time a client has to confirm their appointment before the system cancels the appointment.
- Agents - Earliest available day for scheduling
- 0 - for today, 1 - for next day, etc.
This setting controls when the earliest appointments for agents to schedule will be.
- 0 - for today, 1 - for next day, etc.
- Disabled Time Window
- This is a buffer between the current time, and the earliest available time slot.
- Public - Earliest available day for scheduling
- 0 - for today, 1 - for next day, etc.
- This setting controls when the earliest appointments for the public to schedule will be.
- Disabled Time Window
- This is a buffer between the current time, and the earliest available time slot.
Calendars
Setting Locations: Admin > Manage Settings > Invo Booking > Calendars
- Primary Calendar Provider (this is setup by super admin, but if it needs to be changed, submit a support ticket.)
- Setup the primary calendar provider.
- Outlook 365
- Exchange
- Setup the primary calendar provider.
- Time Slot Availability
- The percent of Agents designated for a time slot to be available. If the percent of available agents is less than this value, then the time slot will be blocked.
- Two-way integration
- Synchronizing VB events with your calendar. This will display events from your calendar on your Invo calendar, and vice versa.
- Two-way integration is only available for Outlook 365.
- Compute agent availability
- Use principal calendar data to compute agents' availability.
- Cache update interval
- This will define how often to pull calendar data for computing availability.
- Google calendar
- This will allow to pull personal Google Calendar events into the calendar view.
- Outlook calendar
- This will allow to pull personal Outlook 365 events into the calendar view.
UX Preferences
Setting Location: Admin > Manage Settings > Invo Booking > UX Preferences
- Time slot text color
- Default - Black
- Available Time Slot Background Color
- Default - Green
- Selected Time Slot Background Color
- Default - Blue